Rufus is a free and open-source portable application for Microsoft Windows that can be used to format and create bootable USB flash drives or Live USBs. Rufus is a very user-friendly tool. The interface is simple and straightforward, and the steps involved in creating a bootable USB drive are clearly explained. Rufus is also very fast, and it can create a bootable USB drive in a matter of seconds...
Rufus is a free and open-source utility software primarily designed for Windows operating systems. Its main function is to create bootable USB drives from ISO image files, allowing users to install or run various operating systems or diagnostic tools directly from a USB stick...
Key features of Rufus software include:
Bootable USB Creation: Rufus is widely used for creating bootable USB drives from ISO, IMG, or ZIP image files. This is particularly useful for installing or upgrading operating systems like Windows, Linux distributions, or other bootable utilities.
Support for Various File Formats: The software supports a wide range of ISO image formats, including ISO9660, UDF, and others, making it compatible with a diverse set of operating systems and tools.
Multiple Partition Scheme and File System Support: Rufus supports both MBR (Master Boot Record) and GPT (GUID Partition Table) partition schemes, as well as various file systems like FAT32, NTFS, exFAT, and more, offering flexibility in creating bootable USB drives.
Fast and Efficient: Rufus is known for its speed and efficiency in creating bootable USB drives. It utilizes various optimizations to minimize the time required to complete the process.
User-Friendly Interface: The software features a straightforward and user-friendly interface, making it easy for both beginners and experienced users to create bootable USB drives with just a few clicks. The interface provides clear instructions and options to guide users through the process.
Portable Application: Rufus does not require installation and is available as a portable application. This means you can run it directly from a USB drive without needing to install it on your computer.
UEFI and Legacy BIOS Support: Rufus is compatible with both modern UEFI-based systems and older Legacy BIOS systems, allowing users to create bootable media for a wide range of computers.
Regular Updates: Rufus is actively maintained and updated by its developers, ensuring that it stays compatible with the latest operating systems and maintaining stability and security.
Some of the things that Rufus can be used for include:
Creating USB installation media for Windows, Linux, and other operating systems.
Creating bootable USB drives for diagnostic and recovery tools.
Flashing BIOS or other firmware from DOS.
Running low-level utilities.
Here are the pros of using Rufus:
Ease of Use: Rufus has a straightforward and user-friendly interface, making it easy for both beginners and experienced users to create bootable USB drives with just a few clicks.
Wide Compatibility: The software supports a wide range of ISO image formats and partition schemes, making it compatible with various operating systems and tools.
Fast and Efficient: Rufus is known for its speed and efficiency in creating bootable USB drives. It employs optimizations that minimize the time required to complete the process.
UEFI and Legacy BIOS Support: Rufus is compatible with both modern UEFI-based systems and older Legacy BIOS systems, allowing users to create bootable media for a wide range of computers.
Portable Application: Rufus does not require installation and is available as a portable application. You can run it directly from a USB drive without needing to install it on your computer.
Regular Updates: Rufus is actively maintained and updated by its developers, ensuring that it stays compatible with the latest operating systems and maintains stability and security.
Overall, Rufus is a great tool for creating bootable USB drives. It is free, easy to use, and very fast. However, it is important to note that Rufus is only available for Windows.
Rufus - Changelog.
How to use Rufus:
Rufus is a popular open-source tool for creating bootable USB drives, primarily used for installing or running operating systems on a computer.
Here are step-by-step instructions on how to use Rufus to create a bootable USB drive:
Important: Creating a bootable USB drive will erase all data on the USB drive, so make sure to backup any important data before proceeding.
1. Download Rufus:
- Download the latest version of Rufus for your operating system (Windows). Rufus is portable app, it does not need to be installed.
2. Insert your USB drive:
- Plug in the USB drive that you want to make bootable. Make sure it has enough capacity to accommodate the OS or software you intend to install.
3. Run Rufus:
- Locate the Rufus executable file you downloaded and run it. You might need to grant administrator privileges if prompted.
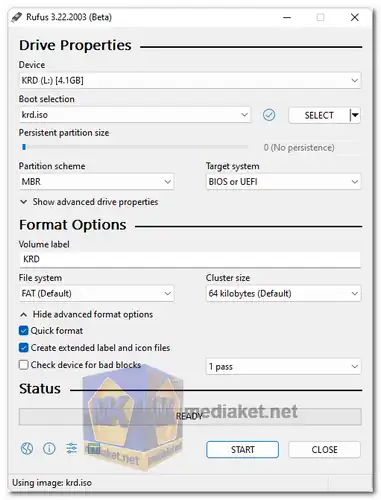
4. Select the USB drive:
- In the "Device" dropdown menu, select your USB drive. Ensure you choose the correct drive because all data on it will be erased.
5. Choose the partition scheme and target system type:
- Under "Partition scheme," select the appropriate option based on your needs. Common choices are:
- MBR (for BIOS or Legacy boot mode): This is suitable for older computers.
- GPT (for UEFI boot mode): Choose this if your computer uses UEFI instead of BIOS.
6. File System and Cluster Size:
- For "File system," you can usually leave it as the default "NTFS" if you're creating a bootable USB for a Windows installation. If you're creating a bootable USB for a Linux distribution, you may choose "FAT32."
- Rufus will automatically set the appropriate cluster size, so you can leave it as it is.
7. Volume Label:
- You can enter a name for your bootable USB drive in the "Volume label" field, but this is optional.
8. Bootable Disk Image:
- Click on the "Select" button under "Boot selection" to browse and choose the ISO file of the operating system or software you want to make bootable. Make sure you have the ISO file downloaded and saved on your computer.
9. Start the process:
- Double-check all the settings to ensure they are correct.
- Click the "Start" button to initiate the process. Rufus will display a warning that all data on the selected USB drive will be destroyed. Confirm if you're ready to proceed.
10. Wait for Rufus to complete:
- Rufus will format the USB drive and create the bootable image. This may take some time, depending on the size of the ISO file and the speed of your USB drive.
11. Completion and Eject:
- Once the process is complete, Rufus will show a "READY" status. You can now safely eject the USB drive from your computer.
Your USB drive is now bootable and ready to be used to install or run the operating system or software you selected. Just insert the USB drive into the target computer and boot from it (you may need to change the boot order in the BIOS/UEFI settings).
How to Use Rufus to create a bootable USB for installing windows 11 by bypassing the new restrictions:
Download Rufus:
For windows 32 bit:
Size: 1.45 MB - Download
For windows 64 bit:
Install version - Size: 1.44 MB - Download
Portable version - Size: 1.44 MB - Download